Ceramic tile gives your space durable beauty and practical performance without a steep learning curve. If you want a floor or wall surface that resists moisture, cleans easily, and comes in countless colors and finishes, ceramic tile delivers that balance of style and function. You’ll learn which tile types suit kitchens, bathrooms, and living areas and how to choose glaze, size, and texture to match your design and lifestyle.
You’ll also get straightforward guidance on installation basics and routine care so your tile stays looking sharp for years. This article walks through what ceramic tile is, when it’s the smart choice, and the simple steps to install and maintain it, so you can make confident decisions for your home.
Overview of Ceramic Tile
Ceramic tiles combine fired clay and mineral powders into durable, water-resistant surfaces. You’ll see it in varied colors, sizes, surface finishes, and performance grades for specific rooms and traffic levels.
What Is Ceramic Tile
Ceramic tile is made primarily from clay (earthenware or stoneware) mixed with other minerals, pressed into shape, and fired in a kiln. A glaze—glass-like coating—often covers the face to add color, pattern, and a protective layer that resists stains and moisture.
Density and water absorption vary by clay type and firing temperature; higher-density stoneware tiles absorb less water and withstand heavier use. Porcelain is a type of ceramic fired hotter and denser, but plain ceramic remains popular for cost-sensitive projects.
You should check PEI (wear) ratings, water-absorption classifications, and slip-resistance values when selecting ceramic tile for a specific location.
Types of Ceramic Tile
Common types break down by body and finish: glazed wall tile, glazed floor tile, unglazed (through-body) tile, and decorative encaustic or mosaic pieces.
Glazed tiles have a glassy surface for easy cleaning and a vast range of designs. Unglazed tiles show the clay body through the surface and provide better slip resistance; they’re often used in patios or rustic interiors.
Specialty types include rectified tiles (machined edges for thin grout lines), large-format tiles, and digitally printed tiles that mimic stone or wood. Choose type based on traffic level, installation method, and desired visual effect.
Common Uses of Ceramic Tile
You’ll most often use ceramic tile on floors and walls in kitchens, bathrooms, entryways, and laundry rooms because it resists water and is easy to sanitize.
Countertops and backsplashes commonly use glazed ceramic for stain resistance and pattern flexibility. In high-moisture or outdoor settings, choose low-absorption stoneware or frost-resistant ratings.
Other uses include fireplace surrounds, stair treads (with appropriate slip rating), and commercial spaces when tiles meet the required durability and maintenance standards.
Ceramic Tile Installation and Care
This section explains how to prepare a surface, the common installation methods you’ll use, and practical maintenance to keep tiles serviceable and attractive. Read the specifications for substrate, adhesive, grout, and sealing so you avoid common failures.
Preparing for Installation
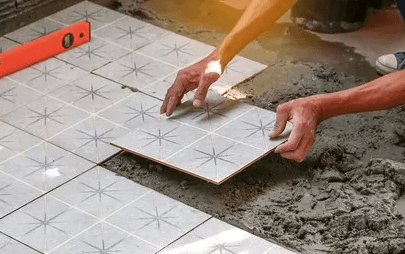
Measure the room and lay out tiles dry to find the best starting point and minimize edge cuts; mark a center line with a chalk snap for alignment. Inspect the substrate: it must be flat within 1/8″ over 10 feet for floor tile and rigid for wall tile. Repair cracks, remove paint or loose material, and install a cement backerboard or uncoupling membrane where moisture or movement is expected.
Choose the right thin-set mortar and trowel notch size for your tile size and substrate; larger tiles and uneven backerboards require a larger notch (e.g., 1/2″ notch for some large-format tiles). Account for movement joints around perimeters and at changes in plane; follow tile manufacturer and local code spacing. Allow materials to acclimate to room temperature 24–48 hours before installing.
See also: Scaling Your Business with an Expert Salesforce Marketing Cloud Consultant
Installation Methods
Start by applying thin-set with a notched trowel and comb in one direction to create consistent bed thickness. Butter large-format or back-butter tiles when necessary to achieve full coverage and prevent hollow spots; aim for 95–100% coverage on floors and at least 80% on walls in wet areas. Use tile spacers to maintain grout joint width and check alignment frequently with a straightedge.
For wet areas or substrates subject to movement, install a waterproof membrane under the tile or use an integrated backer system. For showers and tubs, follow manufacturer instructions for slope and weep holes. Cut tiles with a wet saw for straight cuts and a tile nipper for small irregular shapes; safety glasses and hearing protection are essential. Allow thin-set to cure per product directions before grouting.
Maintenance and Cleaning
Sweep or vacuum regularly to remove grit that can abrade grout and tile glaze; use a soft-bristle broom or vacuum with a hard-floor setting. Clean with pH-neutral cleaners formulated for ceramic/porcelain; avoid acidic cleaners (vinegar) on grout and abrasive pads on polished surfaces. For stubborn stains, use a paste of baking soda and water applied to grout lines, let sit 10–15 minutes, then scrub with a nylon brush.
Reseal grout periodically based on use—typically every 1–3 years for high-traffic or wet areas. Replace cracked or missing grout promptly to prevent water intrusion and substrate damage. For chips or cracked tiles, replace the affected tile: remove grout around the tile, break the tile out carefully, clean the cavity, and bed a new tile with thin-set, matching the grout joint width.